WELCOME
We the board members of Sanchtech Computer Technology Centre, Osogbo branch are using this medium to express our profound gratitude to the members of this establishment. It is our joy that we all left and came back to perform our various task ourselves; we pray that the joy of the season will never depart from us (Amen). You are once again welcome to this year, a year of opportunities, possibilities, prosperities, protection and splendid wealth.
Consequently, the agreement signed by you was agreed upon to abide by the rules and regulations of SCTC which are still intact and operational based on the fact that the organization is still in it state. You {Apprentice (s)/ Staff (s)} is/are hereby warned against any form of violation either willingly or unwillingly.
We cannot but state clearly that recent action on fees payment was not encouraging. We are not happy about the ugly result, the way you reacted is not promising in all form and we are going to scrutiny that in this session. It is stated that payment of fees was an important item in our agenda, so we cannot tolerate the recent outcome. ‘Promiscuity of the mind comes promiscuity of the body’ So here we take our stand, all things stands still except for does that has successfully completed their registration and had had his/her ID card will be able to have access to any property of SCTC, continue their lectures and will graduate as at when due.
We are glad to introduce to you that the online training section is now available; we are working on the possibility of acquiring the highest profile ever before now. After the completion of your registration and your request form properly approved, you will be giving a Username and Password that will enable you to access your account online and download lectures you missed. The Director has urge the board members to provide a standard and effective blog site for inquire that are far from the inward overview. As you all know, SCTC is all about motivation and we are here to modernize you. Computer has advance to informative age and we have to be dynamic with it. So place your post at the site below for further information:
http://www.sanchtech.wordpress.com. We shall reply nearly immediately
OR
Send us e-mail to this address:
OR
Call +2347034922510, +2348091024811.
Kindly accept all terms used in this note, all inconveniencies are highly regretted and hope you find this useful for the continuous and perfect honor of our contract. We thank you in all manners to the acceptance of these and happy has you take positive step towards resolving where it concerns you. Best wishes of God and remember, “The gods will not do for a man, what a man must do for himself”
Yours faithfully,

Director
SCTC, Osogbo.

How-To Geek


Technology often yields ridiculous conveniences, like being able to turn on your computer from miles away without pushing the power button. Wake-on-LAN, has been around for a while, so let’s see how it works and how we can enable it.
What is Wake-on-LAN?
Wake-on-LAN is an industry standard protocol for waking computers up from a very low power mode remotely. The definition of “low power mode” has changed a bit over time, but we can take it to mean while the computer is “off” and has access to a power source. The protocol also allows for a supplementary Wake-on-Wireless-LAN ability as well.
WoL is dependent on two things: your motherboard and your network card. Your motherboard must be hooked up to an ATX-compatible power supply, as most computers in the past decade or so are. Your Ethernet or wireless card must also support this functionality. Because it is set either through the BIOS or through your NIC’s firmware, you don’t need specific software to enable it. Support for WoL is pretty universal nowadays, even when it’s not advertised as a feature, so if you have a computer built in the past decade or so you’re covered. If, however, you have a more modern computer, you may find that you have advanced BIOS options for allowing the computer to power on via a time schedule. It’s not technically WoL, but in terms of functionality, it’s pretty close.
For those of you who build your own rigs, take care when buying an Ethernet card. While most built-in cards on motherboards don’t need this step, discrete network cards often need a 3-pin cable attached to the motherboard to support WoL. Do your research online before you buy so you’re not disappointed later on down the line.
The MagicPacket: How WoL Works
WoL-enabled computers essentially wait for a “magic packet” to arrive that includes the NIC’s MAC address in it. These magic packets are sent out by professional software made for any platform, but can also be sent by routers and internet-based websites. The typical ports used for WoL magic packets are UDP 7 and 9. Because your computer is actively listening for a packet, some power is feeding your network card which will result in your laptop’s battery draining faster, so road warriors should take care to turn this off when you need to eke out some extra juice.

Magic packets are usually sent over the entirety of a network and contain the subnet information, network broadcast address, and the MAC address of the target computer’s network card, whether Ethernet or wireless. The above image shows the results of a packet sniffer tool used on magic packet, which brings into question exactly how secure they are when used in unsafe networks and over the internet. On a secure network, or for basic home use, there shouldn’t be any practical reason to worry. Many motherboard manufacturers often implement software along with WoL capabilities to offer hassle-free or largely configuration-free usage scenarios.
Enabling WoL on Your System
BIOS
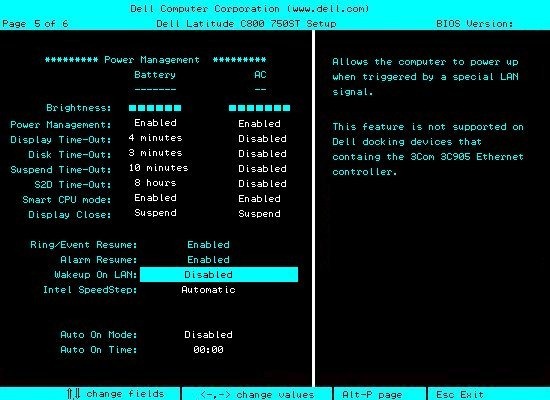
Most older computers and many modern ones have their WoL settings buried in the BIOS. Depending on your system, you need to hit Escape, F2, or Delete to get into the BIOS, but if you’re not sure then you should check your system’s documentation. Once you’re in, check under Power Management or Advanced Options or something of that sort.

On this HP computer’s BIOS, the setting is found near the “resume after power failure” option.
Many computer, however, do not have a BIOS option. Fortunately, this doesn’t mean that the capability isn’t there, it just means we need to go through the operating system to enable WoL.
Windows
Click Start, then search for and open the Device Manager. Find your networking device in the list.

Right click on it and go to Properties, then click on the Advanced tab.

Scroll down in the list to find “Wake on Magic Packet” and change the Value to “Enabled.” You can leave the other “Wake on” settings alone. Click OK when you’re done.
OS X
Open up your System Settings and choose Energy Saver.

Under the Options tab, you should see “Wake for Ethernet” or something similar. This enables Wake-on-LAN.
Linux
Ubuntu has a great tool that can check to see if your machine supports WoL and can enable it. Open up a terminal and install “ethtool” with the following command:
sudo apt-get install ethtool
You can check your compatibility by running:
sudo ethtool eth0
If your default interface is something else, substitute it for “eth0”.

Look for the “Supports Wake-on” section. As long as one of the letters listed is “g,” you can use magic packets for WoL. To enable this option, use the following command.
sudo ethtool -s eth0 wol g
This should take of it. You can run the command to check and see if it’s enabled now. Look for the “Wake on” section. You should see a “g” instead of a “d” now.

Sending WoL Magic Packets
To send out WoL requests, you have a cornucopia of options available.

Depicus has an excellent series of lightweight tools to get the job done, including a GUI-based one for Windows and command-line-based one for both Windows and Mac OS. Wiki.tcl.tk has a great cross-platform lightweight script that handles the requests as well.
DD-WRT has great WoL support, so if you don’t feel like downloading software to do it, you really don’t have to. Lastly, if you’re out and about,
• Tutorial on ADB and Fastboot
Posted on: April 15, 2012
By
I decided to start this tutorial with ADB and FASTBOOT, but am definitely going through Rooting and Flashing Android Phones
What are ADB and Fastboot? HOW DO YOU INSTALL AND USE EACH OF THEM?
ADB (Android debug bridge) and Fastboot are two applications that enable the user to control android devices from a personal computer, including flashing firmwares and issuing commands to an Android device. Both ADB and Fastbook are included in the ANDROID SDK (Software Development Kit).


Step 1. Install the Java Runtime Environment (most of you, already have this, but if not, the link is: http://www.java.com/en/download/index.jsp) 
And Java SE 7u2 http://www.oracle.com/technetwork/java/javase/downloads/jdk-7u2-download-1377129.html. Be sure to select the version that works with your PC’s operating system: (jdk-7u2-windows-i586.exe is for Windows7, 32bit version).

Step 2. Get the ADK. Go to: Android SDK | Android Developers http://developer.android.com/sdk/index.html , and download the version for your PC’s operating system. Most users will download the installer_r16-windows.exe, which is for Windows XP/Vista/7.

Normally the Android SDK is installed in Program Files, but I recommend using a simple path like C:\Android.

Step 3. Get the API. After the installation is finished, run the Android SDK for the first time, at which point you will be prompted to download and install the Android SDK tools as well as the required API’s. For instance, my tablet is running Android version 2.3.3 so I downloaded the Android 2.3.3 API.

Step 4. Add the path to the SDK to your environment. Using Windows explorer, navigate to the folder where you installed your Android SDK tools and from the address bar copy the path. (So, if you installed the SDK in
C:\Android\Android-sdk\platform-tools, that will be the location to which you will navigate.)
Now COPY that path from the address bar.

Go to My Computer, right click, and select “Properties.” Click on the “Advanced” tab, then click on the “Environment Variables” button. The lower section will include a list of system variables. Use the scroll bar to navigate to “Path”, then click “edit”. Make sure you locate your cursor at the END of the “variable value” field, then type (without quotation marks) “;” then paste the path you just copied. The end of your path should now look like
;c:\android-sdk-windows\platform-tools (depending upon where your path is) OR
;C:\Program Files\Android\android-sdk\platform-tools (if you permitted it the SDK to install in \Program Files).
In either case, make sure there is no space after the semicolon!
Keep in mind that if you accidentally delete the existing Path information, you may inadvertently corrupt your Windows installation (so if you think you have made a mistake, press [CANCEL] repeatedly to back out of any changes and start over.


Step 5. Install the Arnova drivers. Go to ftp://support.archos.com/ARCHOS%20it/ADB/. (If you already have the drivers installed, you can skip ahead to Step 6.)
and download the adb_winusb_driver.zip. Next go to http://forum.xda-developers.com/showthread.php?t=803682 and download “Super One Click.”

Extract the files (remembering where you put them), then connect your tablet in debug mode.) Debug mode is not the same as recovery mode (required to flash the RK29xx tablet). You set Debug Mode from your tablet by going into Settings –> Applications –> Development –> check the “USB Debugging” box. When you connect the tablet to the PC, the PC will attempt to load new drivers. Tell the PC you will choose the drivers, and point it to the location where you extracted the driver files. If you get a warning that the drivers are not signed, be sure to let the OS continue anyway.

Step 7. Check the connection. Open a command line box by pressing [Start], [run] and then type “cmd” (without the quotes), then press [Enter].

At the DOS prompt, type:
C:\Android\android-sdk\platform-tools\adb devices
then press [Enter] and you should get a result similar to the following:
* daemon not running. starting it now on port 5037 *
* daemon started successfully *
List of devices attached
0123456789ABCDEF device
Try the command again this time using Fastboot. At the command prompt, type:
C:\Android\android-sdk\platform-tools\fastboot devices [Enter] and you should get a similar result.
Congratulations, you can now use Adb and Fastboot to issue commands to your tablet while it is connected to the PC. Advanced users of rooted tablets will even be able to pass commands to Superuser and busybox via adb, but that’s for another tutorial!
This tutorial has been edited in English from an adapted translation in English from DanielVd tutorial
The original translation was made by globula_neagra, and edited further by arctablet.com.
Edited by Sanchtech
